
After seeing the price tag on even the most simple swing sets I decided it would be a good idea to just build my own homemade backyard swing set. I am very new to large scale DIY projects and this easy diy swing set was a seriously great way to dip my toe into the world of building. Honestly, now I am hooked. If you are like me a building a stand-alone swing set probably feels intimidating but I promise that it really is incredibly easy. Follow these detailed plans and you will have an amazing swing set in your own backyard!

Discloser Note:
This post may contain affiliate links, which means I make a small commission at no extra cost to you. See my full disclosure here.
DIY Swing Set Plans
Luckily, for this easy build you do not need to have any fancy equipment. One of the best parts of using this guide to build your own swing set is that the required materials don’t include any major tools. So if you are new to DIY you are not looking at adding the extra cost of large equipment. That was a win in my book.
Materials List
- 2 – Easy 1-2-3 A-Frame Swing Set Brackets And Hardware
- 1 – 4×6 Top Beam
- 4 – 4×4 Side Support Legs
- Up to 3 Swing Set Swings
- Swing Hardware
- Power Drill
- Drill Bit
- Socket Wrench
- 4 – Ground Anchors (optional)
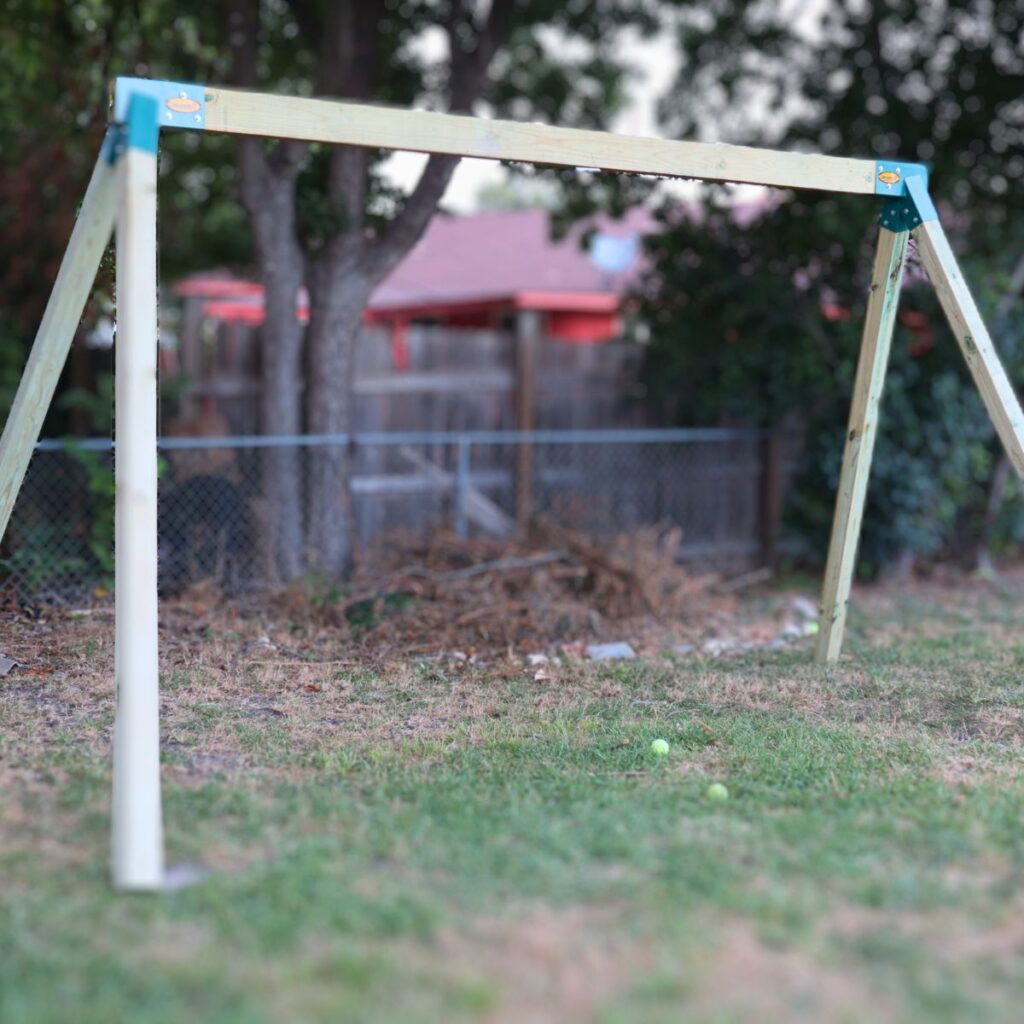
A-Frame Swing Brackets
There are a few things that you want to consider when you are building the swing frame and one of those are the type of brackets you are going to use on your homemade backyard swing set. What makes this such an easy diy swing set project is using the Easy 1-2-3 A-Frame Swing Set Brackets And Hardware.
I love these so much that I have a separate post dedicated to this A frame swing set bracket. The brackets and the hardware kit that comes with them make this diy project a breeze.

Pressure-Treated Lumber
The second thing to consider is the lumber that you purchase. Because you want your homemade playset to last a long time it is a good idea to use pressure-treated wood that says it made for ground contact. Pressure-treated lumber is infused with preservatives under high pressure, which makes it highly resistant to decay and insect damage, extending the lifespan of the swing set. You also want pressure-treated wood because it is more durable and less likely to warp or degrade over time, providing a reliable and long-lasting foundation for the swing set.
Swing Seat
Making your own simple swing sets means that you have a lot more freedom when it comes to choosing what kind of swing seat you will put on. your diy swing set. We choose to put two swing saucers on our swing set but you can put a tire swing, trapeze bar, airplane swing, or even a traditional swing.
*Bonus Tip* Before you jump on Amazon to purchase your swing seat check on Facebook Marketplace. Sometimes you can find a free swing or a highly discounted one.
Step-By-Step Instructions
Step 1: Gather the Materials and Tools Before you begin, ensure you have all the necessary materials and tools listed above. Double-check that you have the required number of brackets, beams, legs, swings, swing hardware, and the optional ground anchors.
Step 2: Choose a Location Select a suitable location for your swing set. Ensure the area is level and free from obstacles. Consider leaving some space around the swing set for safe swinging.
Step 3: Assemble the A-Frame Brackets Follow the instructions provided with the Easy 1-2-3 A-Frame Swing Set Brackets and assemble them using the included hardware. Typically, these brackets will form the basis of the swing set’s A-shaped frame.
Step 4: Prepare the 4×6 Top Beam Place the 4×6 top beam on a flat surface. Measure and mark the locations where the brackets will attach to the beam. The brackets should be positioned at each end of the beam.
Step 5: Attach Brackets to the Top Beam Using a power drill and the appropriate drill bit, pre-drill holes in the marked positions on the 4×6 top beam. Then, using a socket wrench, secure the brackets to the beam with the provided hardware. Make sure the brackets are firmly attached to the beam.

Step 6: Set Up the 4×4 Side Support Legs Position the A-frame brackets with the attached top beam at the desired location. Place the 4×4 side support legs inside the brackets on each side. The legs should be perpendicular to the top beam and firmly inserted into the brackets.
Step 7: Secure the Side Support Legs Using the power drill and the appropriate drill bit, pre-drill holes through the brackets and into the 4×4 side support legs. Then, use the socket wrench to secure the brackets to the legs with the provided hardware. Ensure the legs are stable and securely attached to the brackets.
Step 8: Install the Swings Attach the swing hardware to the 4×6 top beam. The number of swings you can install will depend on the available space and the swing set’s design. Make sure the swings are evenly spaced and hang at an appropriate height for the intended users.
Step 9: Optional – Install Ground Anchors If you want additional stability and safety, consider installing ground anchors. Dig holes at each leg’s base and insert the ground anchors. Follow the manufacturer’s instructions to secure them properly.
Step 10: Safety Check Once the swing set is fully assembled, perform a safety check. Ensure all components are securely attached, and there are no sharp edges or protruding screws. Test the swings to verify they are working smoothly and safely.
Estimated Cost For DIY Swing Set
The final cost of your swing set will depend largely on the price of lumber at your local store. I will provide you with the prices I paid to give you an idea of what to expect. I also find that looking at Home Depot online is a great option for getting a better estimate on the lumber prices in my area.
- Total lumber cost: ~$80
- A-Frame Brackets ~$70
- Saucer Swings ~$80 (these frequently go on sale or can be found used at a reduced rate)
*Bonus Tip* There is a good chance you may not have a vehicle that can transport the lumber. If that is the case delivery is an option. One thing to keep in mind however is the price of that delivery. At the time I’m writing this it would have cost me $80 to have Home Depot deliver but I was able to get free delivery from McCoy’s. The price of lumber at McCoy’s was a tad bit higher but it made so much more sense to spend around $2-3 more on the lumber there with the free delivery option. So if you need delivery be sure to shop around for those prices as well.

Maintenance And Care Instructions
- Regular Inspections: Conduct regular inspections of the swing set to check for any signs of wear, loose hardware, or damage. Pay special attention to the brackets, beams, and swing attachments.
- Tighten Hardware: Periodically check and tighten all nuts, bolts, and screws. Over time, these may become loose due to usage and weather conditions.
- Cleaning: Clean the swing set regularly to remove dirt, debris, and any build-up of mold or mildew. Use a mild detergent and water solution, and avoid harsh chemicals that may damage the wood or hardware.
- Sealing the Wood: If you used pressure-treated lumber, the wood is already more resistant to decay. However, it’s still a good idea to apply a sealant or wood preservative every year or two to protect it from moisture and prolong its life.
- Stain or Paint: If you desire a different color or aesthetic, you can apply a stain or outdoor paint to the swing set. Ensure the chosen product is suitable for outdoor use and follow the manufacturer’s guidelines.
- Check Swings and Seats: Regularly inspect the swings and seats for any signs of wear or damage. Replace any worn-out or frayed ropes or chains immediately.
- Seasonal Precautions: Take precautions during extreme weather conditions. In harsh winter weather, consider covering or storing the swings indoors to protect them from snow and ice. Similarly, during storms or high winds, remove any loose objects or swings that could become hazards.
- Avoid Chemical Treatments: Avoid using chemical treatments or harsh solvents on the swing set, as they may compromise the integrity of the wood and pose health risks to children.
- Maintain Ground Anchors (if used): If your swing set is anchored to the ground, inspect the ground anchors regularly and ensure they are secure. Re-anchor or reposition them as needed.
- Set Usage Guidelines: Establish clear rules and guidelines for using the swing set safely. Teach children how to use the swings properly, including not jumping off while in motion and not overcrowding the swings.
- Age-Appropriate Swings: As children grow, consider updating the swings to be age-appropriate for their size and weight. Adjust the swing seats or replace them accordingly.

Building A DIY Basic Wooden Swing Set
This diy swing set will be a great addition to your backyard that will bring much fun and imaginative play to your family and friends. Imagine the laughter and excitement as your kids swing through the air, their imaginations taking flight with every push.
Once you’ve built your DIY swing set, you’ll witness the excitement in your children’s eyes as they take their first swings and let their imaginations soar. The benefits of outdoor play on physical and mental development are well-known, and with your homemade swing set, your children will have a safe and stimulating environment to enhance their motor skills, coordination, and social interactions.
Leave a Reply